Connect to
multiple EPBCS environments via Smart View Shared Connections XML
Why not save valuable time by
creating a Smart View environments short-cut?

Here’s how!
First, gather the following details for each
environment that you would like to add to your drop-down list:
1. Environment
URL (PBCS/EPBCS):
Recently provisioned environments:
https://epm-exampleDoM.epm.exampleDC.oraclecloud.com/HyperionPlanning/SmartView
Environments provisioned before 2020:
(If unsure, check your web URL - does it start with planning or epm, match URL)
https://planning-exampleDoM.pbcs.exampleDC.oraclecloud.com/HyperionPlanning/SmartView
Environments provisioned before 2020:
(If unsure, check your web URL - does it start with planning or epm, match URL)
https://planning-exampleDoM.pbcs.exampleDC.oraclecloud.com/HyperionPlanning/SmartView
(where Domain name = exampleDoM and Data centre = exampleDC)
2. Chosen Shortcut Name: ie. Finance PBCS Production
Tip 1: Other Oracle
Provider Types
I have only included the PBCS connection as an example here. See the Oracle Documentation for examples on how to connect to Essbase, EPRCS and more!
I have only included the PBCS connection as an example here. See the Oracle Documentation for examples on how to connect to Essbase, EPRCS and more!
Tip 2:
Connecting Smart View to Oracle Financials Cloud ERP
For those that use Oracle Financials
Cloud as a data source for Oracle PBCS, you may wish to use Smart View to query
the ERP data which you can do by connecting to the underlying Essbase ASO cube.
Use the Essbase Connections URL: https://exampleDoM.bi.exampleDC.oraclecloud.com/aps/SmartView
Use the Essbase Connections URL: https://exampleDoM.bi.exampleDC.oraclecloud.com/aps/SmartView
For more tips on how to pull
data from Oracle Financials Cloud to PBCS see Lydia’s blog.
Edit 22-01-2021: You don't need the '.fa' in the URL
Edit 22-01-2021: If you have issues with the shortcut name of your connection showing as Oracle Essbase, try changing Product id="HP". It seems illogical but worked for me!
Edit 22-01-2021: If you have issues with the shortcut name of your connection showing as Oracle Essbase, try changing Product id="HP". It seems illogical but worked for me!
Step 1.
Open
a text editor to begin creating your XML file – Notepad will do.
Begin
the XML as follows:
<?xml version="1.0"
encoding="UTF-8"?>
<res_GetProvisionedDataSources>
Step 2.
For
each environment you wish to add to the drop-down list add the following syntax:
EPBCS/PBCS
Environments:
<Product id="HP"
name="HP-11.1.2" displayVersion="version">
<Server name="EPBCS Production
Environment" context="https://planning- exampleDoM.epm.exampleDC.oraclecloud.com/HyperionPlanning/SmartView"></Server>
</Product>
Step 3.
</res_GetProvisionedDataSources>
Click
Save As, then change the document type to XML. Save the file in the SmartView
folder that contains the SmartView exe file, if possible.
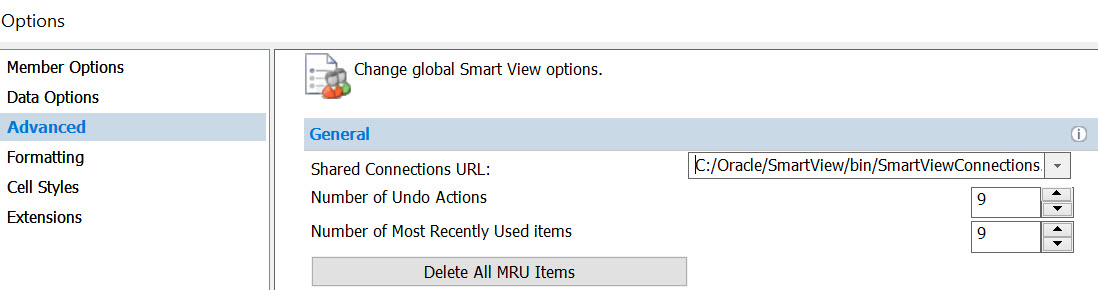
Step 4.
Reference
the XML file location in your SmartView Options URL setting.
For example, I store the XML file in the SmartView install folder and therefore the URL is:
C:/Oracle/SmartView/bin/SmartViewConnections.xml
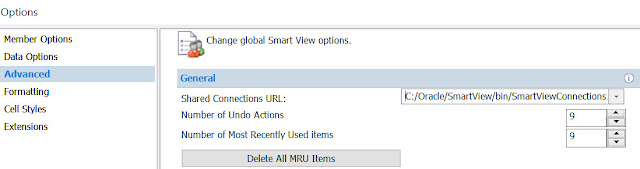
For example, I store the XML file in the SmartView install folder and therefore the URL is:
C:/Oracle/SmartView/bin/SmartViewConnections.xml
Ta Da!
The full script should resemble
the below:
<?xml version="1.0"
encoding="UTF-8"?>
<res_GetProvisionedDataSources>
<Product id="HP"
name="HP-11.1.2" displayVersion="version">
<Server name="EPBCS Production Environment" context="https://planning-domain.pbcs.datacenter.oraclecloud.com/HyperionPlanning/SmartView"></Server>
</Product>
<Server name="EPBCS Production Environment" context="https://planning-domain.pbcs.datacenter.oraclecloud.com/HyperionPlanning/SmartView"></Server>
</Product>
<Product id="HP" name="HP-11.1.2" displayVersion="version">
<Server name="EPBCS Test Environment" context="https://planning-test-domain.pbcs.datacenter.oraclecloud.com/HyperionPlanning/SmartView"></Server></Product>
<Product id="HP" name="HP-11.1.2" displayVersion="version">
<Server name="Oracle Financials Production Environment (Essbase cube)" context="https://domain.bi.datacenter.oraclecloud.com/aps/SmartView"></Server>
</Product>
</res_GetProvisionedDataSources>
Reduced risk as opposed to retail-boxed licensed software. The software is always accessible, and you don't sacrifice productivity time should a workstation have to be rebuilt and you have to reinstall software. free Calendly review
ReplyDelete